随着ajax的流行,异步数据请求交互运行在不刷新浏览器的情况下进行。而异步交互体验的更高级版本就是SPA——单页应用。单页应用不仅仅是在页面交互是无刷新的,连页面跳转都是无刷新的,为了实现单页应用,所以就有了前端路由。
前端路由实现起来其实也很简单,就是匹配不同的url路径,进行解析,然后动态的渲染出区域html内容。但是这样存在一个问题,就是url每次变化的时候,都会造成页面的刷新。那解决问题的思路便是在改变url的情况下,保证页面的不刷新。
两种前端路由实现方式
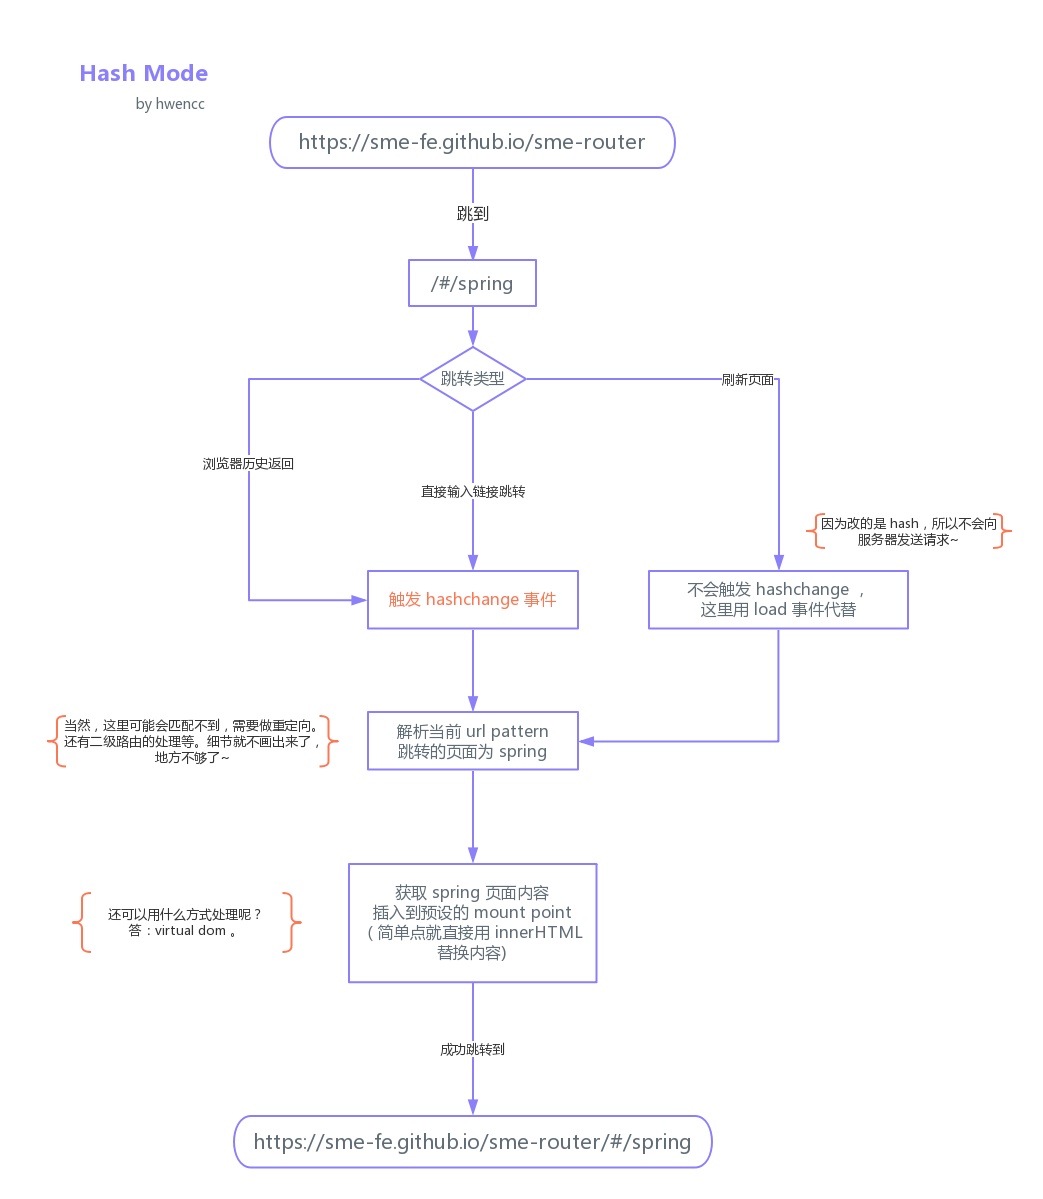
1.hash模式
在2014年之前,大家是通过hash来实现路由,url hash就是类似于
1 | http://www.xxx.com/#/login |
这种 #。后面hash值的变化,并不会导致浏览器向服务器发出请求,浏览器不发出请求,也就不会刷新页面。另外每次hash值的变化,还会触发 hashchange 这个事件,通过这个事件我们就可以知道hash值发生了哪些变化。然后我们便可以监听hashchange来实现更新页面部分内容的操作。
流程图:
1 | class Routers { |
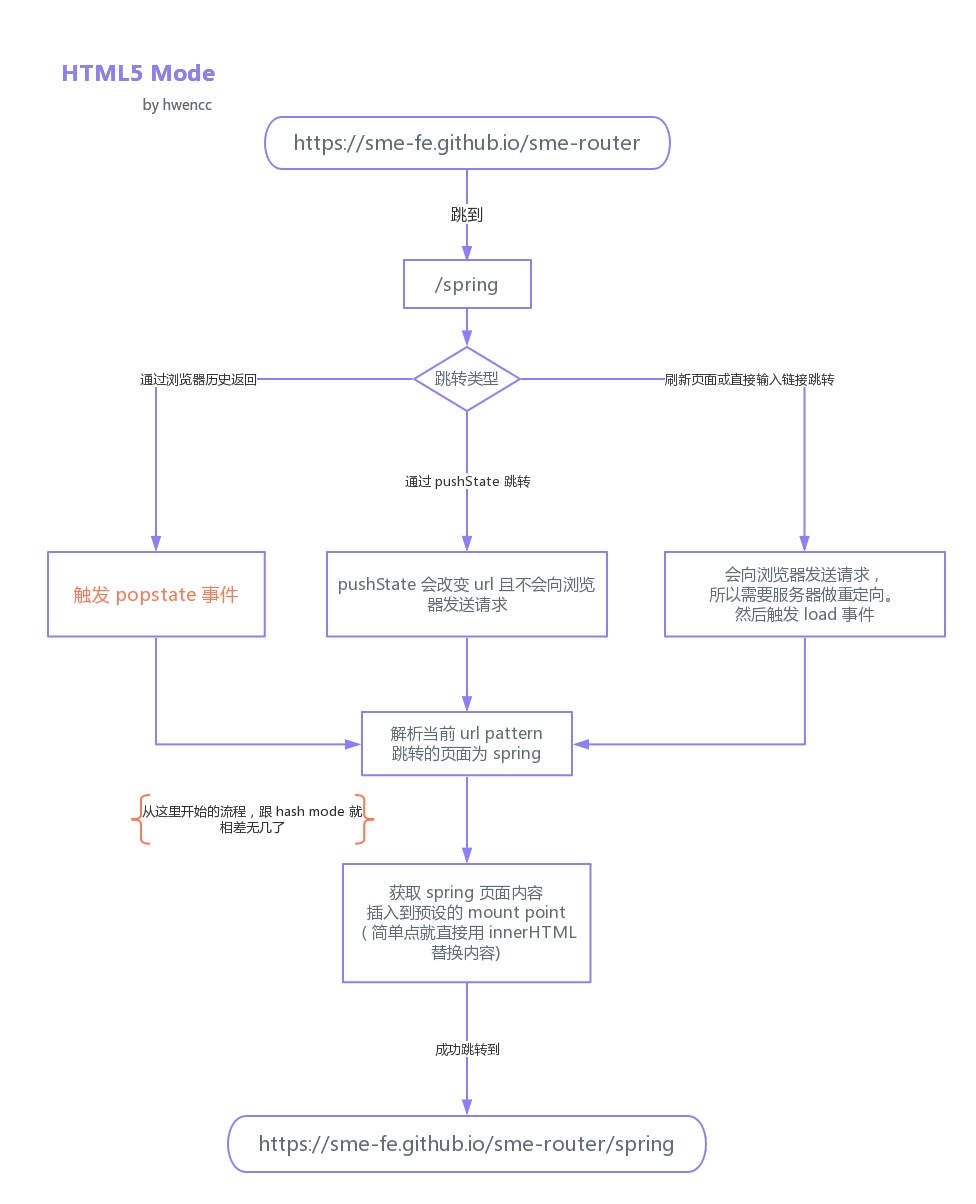
2.history模式
14年后,H5标准的发布多了两个APIpushState 和 replaceState,通过这两个API实现的修改url不会发送请求,同时还有popstate 事件。但因为没有 # 号,所以当用户刷新页面之类的操作时,浏览器还是会给服务器发送请求。为了避免出现这种情况,所以这个实现需要服务器的支持,需要把所有路由都重定向到根页面。
History 接口允许操作浏览器的曾经在标签页或者框架里访问的会话历史记录。
History.length只读返回当前session中的history个数,包含当前页面在内。举个例子,对于新开一个tab加载的页面当前属性返回值1。
History.state只读返回一个表示历史堆栈顶部的状态的值。这是一种可以不必等待
popstate事件而查看状态而的方式History.back()前往上一页, 用户可点击浏览器左上角的返回按钮模拟此方法. 等价于
history.go(-1)History.forward()在浏览器历史记录里前往下一页,用户可点击浏览器左上角的前进按钮模拟此方法. 等价于
history.go(1)History.go()通过当前页面的相对位置从浏览器历史记录( 会话记录 )加载页面。比如:参数为-1的时候为上一页,参数为1的时候为下一页. 当整数参数超出界限时,例如: 如果当前页为第一页,前面已经没有页面了,我传参的值为-1,那么这个方法没有任何效果也不会报错。调用没有参数的
go()方法或者不是整数的参数时也没有效果。History.pushState()history.pushState用于在浏览历史中添加历史记录,但是并不触发跳转,此方法接受三个参数,依次为:state:一个与指定网址相关的状态对象,popstate事件触发时,该对象会传入回调函数。如果不需要这个对象,此处可以填null。title:新页面的标题,但是所有浏览器目前都忽略这个值,因此这里可以填null。url:新的网址,必须与当前页面处在同一个域。浏览器的地址栏将显示这个网址。history.replaceState方法的参数与pushState方法一模一样,区别是它修改浏览历史中当前纪录,而非添加记录,同样不触发跳转。popstate事件,每当同一个文档的浏览历史(即history对象)出现变化时,就会触发popstate事件。需要注意的是,仅仅调用
pushState方法或replaceState方法 ,并不会触发该事件,只有用户点击浏览器倒退按钮和前进按钮,或者使用JavaScript调用back、forward、go方法时才会触发。另外,该事件只针对同一个文档,如果浏览历史的切换,导致加载不同的文档,该事件也不会触发。
History.replaceState()按指定的数据,名称和URL(如果提供该参数),更新历史栈上最新的入口。这个数据被DOM 进行了不透明处理。
缺点:
- 用户刷新的时候还是会发送请求,这时候需要服务器进行重定向。
流程图:
1 | class Routers { |
Vue-router的实现
vue-router在代码中的定义
1 | import VueRouter from 'vue-router' |
可以看出来vue-router的注入是需要通过Vue.use的,而在使用的时候我们需要vue-router的router-view和router-link组件,以及this.$router/$route这样的实例对象。
在源码中通过new VueRouter({...})我们创建了一个VueRouter 的实例。VueRouter中通过参数mode来指定路由模式,前面已经简单的了解了一下前端路由的2种模式。
VueRouter对不同模式的实现大致是这样的:
- 首先根据
mode来确定所选的模式,如果当前环境不支持history模式,会强制切换到hash模式; - 如果当前环境不是浏览器环境,会切换到
abstract模式下。然后再根据不同模式来生成不同的history操作对象。