1.单例模式 1 2 3 4 5 6 7 8 9 10 11 12 13 14 15 16 17 class Singleton static getInstance() { if (!Singleton.instance) { Singleton.instance = new Singleton(); } return Singleton.instance; } } const s1 = Singleton.getInstance()const s2 = Singleton.getInstance()s1 === s2
闭包
1 2 3 4 5 6 7 8 9 10 11 12 13 14 15 function singleton (let Single = (function ( let instance = null ; return function ( if (!instance) { instance = new singleton(); } return instance; } })() const s1 = new Single();const s2 = new Single();console .log(s1 === s2);
实现一个全局的模态框 1 2 3 4 5 6 7 8 9 10 11 12 13 14 15 16 17 18 19 20 21 22 23 24 25 26 27 28 29 30 31 32 33 34 35 36 37 38 39 40 41 42 43 44 45 46 47 48 49 50 51 52 53 54 55 56 57 58 59 60 61 62 63 64 65 66 67 68 69 70 71 72 73 <!DOCTYPE html > <html lang ="en" > <head > <meta charset ="UTF-8" > <title > 单例模式弹框</title > </head > <style > #modal { height: 200px; width: 200px; line-height: 200px; position: fixed; left: 50%; top: 50%; transform: translate(-50%, -50%); border: 1px solid black; text-align: center; } </style > <body > <button id ='open' > 打开弹框</button > <button id ='close' > 关闭弹框</button > </body > <script > const Modal = (function () let modal = null return function () if (!modal) { modal = document .createElement('div' ) modal.innerHTML = '我是一个全局唯一的Modal' modal.id = 'modal' modal.style.display = 'none' document .body.appendChild(modal) } return modal } })() document .getElementById('open' ).addEventListener('click' , function ( const modal = new Modal() modal.style.display = 'block' }) document .getElementById('close' ).addEventListener('click' , function ( const modal = new Modal() if (modal) { modal.style.display = 'none' } }) </script > </html >
2.观察者模式
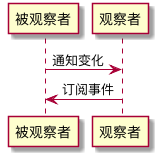
观察者模式定义了一种一对多的依赖关系,让多个观察者对象同时监听某一个目标对象,当这个目标对象的状态发生变化时,会通知所有观察者对象,使它们能够自动更新。 —— Graphic Design Patterns
实现一个Event Bus/ Event Emitter Event Bus(Vue、Flutter 等前端框架中有出镜)和 Event Emitter(Node中有出镜)出场的“剧组”不同,但是它们都对应一个共同的角色——全局事件总线 。
在Vue中使用Event Bus来实现组件间的通讯 创建一个 Event Bus(本质上也是 Vue 实例)并导出:
1 2 const EventBus = new Vue()export default EventBus
在主文件里引入EventBus,并挂载到全局:
1 2 import bus from 'EventBus的文件路径' Vue.prototype.bus = bus
订阅事件:
1 2 this .bus.$on('someEvent' , func)
发布(触发)事件:
1 2 this .bus.$emit('someEvent' , params)
大家会发现,整个调用过程中,没有出现具体的发布者和订阅者,全程只有bus这个东西一个人在疯狂刷存在感。这就是全局事件总线的特点——所有事件的发布/订阅操作,必须经由事件中心,禁止一切“私下交易”!
完整代码 1 2 3 4 5 6 7 8 9 10 11 12 13 14 15 16 17 18 19 20 21 22 23 24 25 26 27 28 29 30 31 32 33 34 35 36 37 38 39 40 41 42 43 44 45 46 47 48 49 50 51 52 53 54 55 56 57 class EventEmitter constructor () { this .eventPool = {}; } on(eventName, cb) { this .eventPool[eventName] ? this .eventPool[eventName].push(cb) : this .eventPool[eventName] = [cb]; } emit(eventName, ...args) { this .eventPool[eventName] && this .eventPool[eventName].forEach(cb => } off(eventName, cb) { if (this .eventPool[eventName]) { let index = this .eventPool[eventName].indexOf(cb); this .eventPool[eventName].splice(index, 1 ); if (this .eventPool[eventName].length === 0 ) delete this .eventPool[eventName]; } } once(eventName, cb) { let self = this ; this .on(eventName, function _cb (...args ) cb(...args); self.off(eventName, _cb); }) } } let event = new EventEmitter();event.on('click' , function f1 ( console .log('f1触发' ) }); event.on('click' , function f2 ( console .log('f2触发' ) }); function f3 ( console .log('f3触发' ); } event.emit('click' ); console .log(event.eventPool);event.once('once' , f3); console .log(event.eventPool);event.emit('once' ); console .log(event.eventPool);-------------------------------------------------------------- f1触发 f2触发 { click : [ [Function : f1], [Function : f2] ] } { click : [ [Function : f1], [Function : f2] ], once: [ [Function : _cb] ] } f3触发 { click : [ [Function : f1], [Function : f2] ] }
观察者模式与发布-订阅模式的区别是什么?
《Learning JavaScript Design Patterns》一书这样说:
“While the Observer pattern is useful to be aware of, quite often in the JavaScript world, we’ll find it commonly implemented using a variation known as the Publish/Subscribe pattern.”
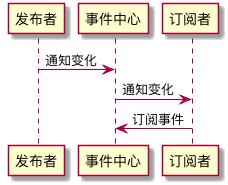
发布/订阅模式是观察者模式的一种变形,两者区别在于,发布/订阅模式在观察者模式的基础上,在目标和观察者之间增加一个调度中心。
发布者直接触及到订阅者 的操作,叫观察者模式。
发布者不直接触及到订阅者、而是由统一的第三方来完成实际的通信的操作,叫做发布-订阅模式 。
观察者模式,解决的其实是模块间的耦合问题,有它在,即便是两个分离的、毫不相关的模块,也可以实现数据通信。但观察者模式仅仅是减少了耦合,并没有完全地解决耦合问题 ——被观察者必须去维护一套观察者的集合,这些观察者必须实现统一的方法供被观察者调用,两者之间还是有着说不清、道不明的关系。
而发布-订阅模式,则是快刀斩乱麻了——发布者完全不用感知订阅者,不用关心它怎么实现回调方法,事件的注册和触发都发生在独立于双方的第三方平台(事件总线)上。发布-订阅模式下,实现了完全地解耦。
3.代理模式 代理模式,式如其名——在某些情况下,出于种种考虑/限制,一个对象不能直接访问 另一个对象,需要一个第三者 (代理)牵线搭桥从而间接达到访问目的,这样的模式就是代理模式。
1.ES6 proxy 1 2 3 4 5 6 7 8 9 10 11 12 13 14 15 16 17 18 19 20 21 22 23 24 25 26 27 28 29 30 31 32 33 34 35 36 37 let obj = { a: 1 , b: 2 , } const p = new Proxy (obj, { get (target, key, value) { if (key === 'c' ) { return '我是自定义的一个结果' ; } else { return target[key]; } }, set (target, key, value) { if (value === 4 ) { target[key] = '我是自定义的一个结果' ; } else { target[key] = value; } } }) console .log(obj.a) console .log(obj.c) console .log(p.a) console .log(p.c) obj.name = '李白' ; console .log(obj.name); obj.age = 4 ; console .log(obj.age); p.name = '李白' ; console .log(p.name); p.age = 4 ; console .log(p.age);
2.事件代理,可能是代理模式最常见的一种应用方式 1 2 3 4 5 6 7 8 9 10 11 12 13 14 15 16 17 18 19 <!DOCTYPE html > <html lang ="en" > <head > <meta charset ="UTF-8" > <meta name ="viewport" content ="width=device-width, initial-scale=1.0" > <meta http-equiv ="X-UA-Compatible" content ="ie=edge" > <title > 事件代理</title > </head > <body > <div id ="father" > <a href ="#" > 链接1号</a > <a href ="#" > 链接2号</a > <a href ="#" > 链接3号</a > <a href ="#" > 链接4号</a > <a href ="#" > 链接5号</a > <a href ="#" > 链接6号</a > </div > </body > </html >
3.缓存代理 缓存代理比较好理解,它应用于一些计算量较大的场景里。在这种场景下,我们需要“用空间换时间”——当我们需要用到某个已经计算过的值的时候,不想再耗时进行二次计算,而是希望能从内存里去取出现成的计算结果。这种场景下,就需要一个代理来帮我们在进行计算的同时,进行计算结果的缓存了。
1 2 3 4 5 6 7 8 9 10 11 12 13 14 15 16 17 18 19 20 21 22 23 24 25 26 27 const addAll = function ( console .log('进行了一次新计算' ) let result = 0 const len = arguments .length for (let i = 0 ; i < len; i++) { result += arguments [i] } return result } const proxyAddAll = (function ( const resultCache = {} return function ( const args = Array .prototype.join.call(arguments , ',' ) if (args in resultCache) { return resultCache[args] } return resultCache[args] = addAll(...arguments) } })()
4.迭代器模式
迭代器模式提供一种方法顺序访问一个聚合对象中的各个元素,而又不暴露该对象的内部表示。 ——《设计模式:可复用面向对象软件的基础》
实现迭代器函数(generator):
1 2 3 4 5 6 7 8 9 10 11 12 function *iteratorGenerator ( yield '1号选手' yield '2号选手' yield '3号选手' } const iterator = iteratorGenerator()iterator.next() iterator.next() iterator.next()
原生实现:
关键点在于next()和return的对象,done用来控制遍历的结束。
1 2 3 4 5 6 7 8 9 10 11 12 13 14 15 16 17 18 19 20 21 const list = ['1' , '2' , '3' ];function iteratorGenerator ( let i = 0 , len = list.length; return { next: function ( let done = i >= len; let value = done ? undefined : list[i++]; return { done: done, value: value } } } } list[Symbol .iterator] = iteratorGenerator for (let key of list) { console .log(key) }
5.工厂模式 将创建对象的过程单独封装,这样的操作就是工厂模式。同时它的应用场景也非常容易识别:有构造函数的地方,我们就应该想到简单工厂;在写了大量构造函数、调用了大量的 new、自觉非常不爽的情况下,我们就应该思考是不是可以掏出工厂模式重构我们的代码了。
1 2 3 4 5 6 7 8 9 10 11 12 13 14 15 16 17 18 19 20 class Product constructor (name) { this .name = name; } init() { console .log(this .name); } } class Factory create(name) { return new Product(name); } } let factory = new Factory();let p1 = factory.create('p1' ), p2 = factory.create('p2' ); p1.init(); p2.init()